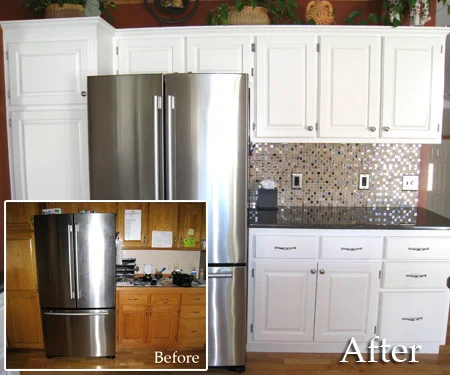
The most influential contributors to your kitchen’s overall design are the cabinets. If your cabinets are old, dated, or just plain ugly, I have an easy solution for you!
Image Source: Curbly, Online
Many people are apprehensive about taking on cabinet painting DIYs, but we are here to tell you that there is nothing to be intimidated by. Once you follow these simple steps, you will be amazed at how so little work could make such a big difference.
DIY Friday: The Simple Way to Repaint Your Kitchen Cabinets
1. Empty and Remove Doors from All Cabinets. Once you have set up a “painting station” in your garage, back yard, etc., you are ready to lay the doors flat, and begin. It is important to have them flat to avoid drip marks.
Image Source: Handyman Club Online
2. Stay Organized. Put all knobs and other hardware in baggies and label them according to where they go in your kitchen. On the back side of your cabinets, label their location as well, in pencil. This will save you a lot of time when re-assembling, and it will keep them aligned perfectly.
Image Source: Wikihow, Online
3. Clean Your Cabinets. Take a spray bottle with some mild soap and warm water and wipe the surfaces to be painted. Removing dust and other residue will allow the paint to adhere better.
4. Sand Surfaces. If your cabinets are already painted or finished, it is important to sand them down to the wood so that you have a fresh surface to work with. It is important to sand because this can make or break the life of the new paint; you want it to last, right? There are many different types of sandpaper out there, so be sure to choose one that is right for your surface. Click here for a sandpaper guide.
5. Primer. Choose a primer that is made for the material you plan on painting. There are many different selections at your local home improvement store. Color is key, as well. If you are planning on painting your cabinets a darker color, you will want to prime them with dark primer. If you are planning on painting them a light color, white or light gray primer will work best. Now, take your brush and using long strokes, cover the cabinets with the primer. Remember that primer is only an adhesive, so it is okay if it doesn’t fully cover the surface, it may almost look transparent. Once you have applied the primer, let it dry.
Image Source: DIY Network, Online
6. Paint. Latex paints are recommended for kitchen cabinets. They are easiest to clean, and the color doesn’t fade over time. We would recommend an angled brush as well as a cabinet roller brush for painting. When painting the doors, it helps to elevate them from the surface you are working on, so you can get to the edges easier. When painting the cabinetry in your kitchen, be sure to tape off any surface you don’t want paint to get on. It is important to avoid dripping. Allow for all surface to dry completely before re-assembling. *Remember that it is not always necessary to paint the inside of your cabinets.
7. Re-assemble, and Enjoy! You will be amazed that you were able to complete this task in such a short amount of time, and make such a difference to your space. It isn’t always necessary to completely reface your kitchen cabinets, especially if your pre-existing ones are still in decent shape. Click the video below for a more visual tutorial.


